Syncing Lovense Max 2 with VR: My Step‑by‑Step Setup
Have you ever wondered what it would be like to fully immerse yourself in a VR adult experience? If you own a Lovense Max 2, you’re in for a treat! The combination of VR and an interactive sex toy like the Lovense Max 2 can create an experience that feels incredibly real. But setting it up can be tricky if you don’t know where to start. Don’t worry—I’ve got you covered! In this guide, I’ll walk you through everything you need to know to get your Lovense Max 2 working with VR, ensuring a seamless and interactive experience.
Step 1: Gather Your Equipment
Before diving into the fun, it’s essential to gather everything you need to get the most out of your long-distance connection. Here’s what you’ll need:
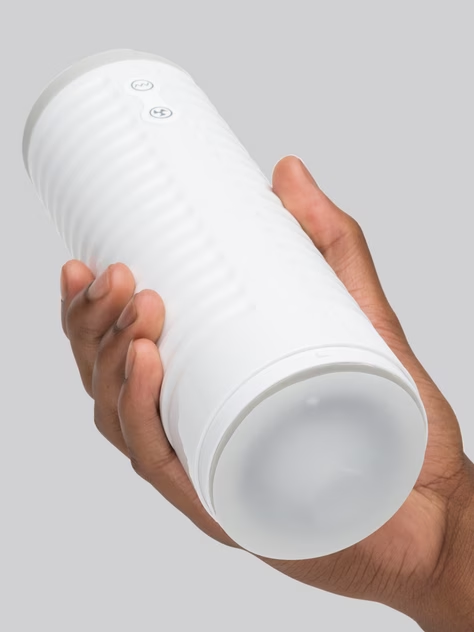
Lovense Max 2 (Fully Charged)
This is your primary tool for the experience, so make sure it’s fully charged. The Lovense Max 2 is not just any vibrator—it’s a game-changer for long-distance relationships. Its ability to sync with your partner’s device means that no matter where you are, the connection is seamless, and the experience feels much more personal. The Max 2’s design is all about enhancing pleasure with its customizable settings, like the air pressure and vibration patterns, making it feel more like the real deal. It’s important to have it charged so it’s ready when you are.
VR Headset (Oculus Quest, HTC Vive, or Valve Index)
This is where things get really interesting. If you’re looking for a full immersive experience, a VR headset is your next must-have. You don’t need to be a tech pro to enjoy VR, but having a headset like the Oculus Quest, HTC Vive, or Valve Index will elevate the experience. These headsets bring the feeling of being together, even when you’re far apart. You can see, hear, and interact with your partner in a way that regular video calls just can’t match. It’s not just about sex—it’s about creating a shared space and moments that make you feel connected, no matter the distance.

Compatible VR App (Whirligig, DeoVR, or Virtual Desktop)
To truly make the magic happen, you’ll need a compatible VR app. Apps like Whirligig, DeoVR, or Virtual Desktop can help you connect in a way that feels natural and real. You’ll be able to explore immersive environments together, creating your own version of intimacy from afar. Make sure to download and sync the app with your headset, so you’re good to go. Each of these apps has unique features, so it’s worth checking out a few to find the one that fits you and your partner’s needs.
Bluetooth-Enabled PC or Smartphone
Now that you have the Max 2 and VR headset, you’ll need a Bluetooth-enabled device to sync everything. Whether you’re using a smartphone or PC, make sure that Bluetooth is turned on. This will allow the Lovense Max 2 to sync with your device, enabling the real-time interactions that make long-distance play so exciting. The Lovense Remote or Connect app will make this process even easier, ensuring that everything is in sync for the ultimate experience. Don’t forget to check that your devices are updated to avoid any syncing issues.
Lovense Remote or Lovense Connect App (For Syncing)
This is the app that ties everything together. The Lovense Remote or Lovense Connect app is crucial for syncing the Max 2 with your partner’s device. These apps are user-friendly and allow you to control the vibrations, patterns, and pressure in real-time. You’ll have complete control, whether you’re the one giving the pleasure or receiving it. The app also allows for some fun features like preset patterns or custom vibration speeds, so you can get creative with how you interact. Make sure you both have it installed and connected to your devices to enjoy everything to the fullest.
Once you have all your equipment set up, you’re ready to create a shared, intimate experience that brings you closer to your partner, no matter the distance. With these tools, you’ll be able to explore new ways of connecting and enjoy a level of intimacy that’s both fun and exciting.
Step 2: Install the Necessary Software
Now that you’ve gathered all your equipment, it’s time to set up the software. This step is crucial for ensuring that everything runs smoothly and your devices work together as they should. Let’s walk through the process of getting everything synced up so you can start enjoying the experience without any tech hiccups.
Download the Lovense Remote App on Your Smartphone or PC
The Lovense Remote app is your gateway to controlling the Max 2 and ensuring that it syncs properly with your partner’s device. Whether you’re using an Android or iOS smartphone, or even a PC, the app is essential for the seamless connection. You can download the app directly from your device’s app store or the Lovense website. It’s easy to set up, and you’ll be able to control your Lovense Max 2 with just a few taps.
For a more flexible experience, the app allows you to control the toy’s vibrations, pressure, and patterns, giving you the power to customize the sensations for your partner. What’s great about this app is the real-time feedback—it’s intuitive and responsive, which is key when you’re trying to create that intimate, long-distance connection. Take a few minutes to get the app installed and familiarize yourself with the features before moving on to the next steps.
Install Lovense Connect on Your PC (If Applicable)
If you’re using a PC setup, Lovense Connect is the software that bridges the gap between your VR headset and the Lovense Max 2. This piece of software ensures that everything is synced and running without any technical issues. Download Lovense Connect on your computer, and make sure that it’s properly installed. Once it’s up and running, connect your VR headset and Lovense Max 2 to your PC. Lovense Connect will allow the app to manage and sync all your devices together, making the connection between the virtual world and your physical experience seamless.
With Lovense Connect, you can control and adjust your Max 2 via your PC, which gives you a bit more flexibility in how you manage things. This is perfect for those who prefer to have a more robust setup with the ability to switch between different devices without losing control over the experience. The interface is user-friendly, so don’t worry if you’re not tech-savvy—it’s designed to be simple and intuitive.

Third-Party Apps: ScriptPlayer or HandyFeeling (Optional)
For some setups, especially if you want a more immersive experience, you may need third-party apps like ScriptPlayer or HandyFeeling. These apps allow you to sync your VR content with the movements of your Lovense Max 2, taking your experience to the next level. These apps provide even more options for controlling the toy’s movements and ensuring that the sensations you feel match up with what you’re experiencing in the virtual world.
ScriptPlayer, for example, is commonly used for syncing your VR experience with specific interactive scripts, so the toy reacts in real-time to what’s happening in the VR environment. HandyFeeling is another app that pairs perfectly with certain types of VR content, enhancing the experience with more nuanced controls. Both of these apps allow you to create a deeper, more interactive connection with your partner. It’s not necessary for everyone, but if you’re looking for a truly immersive experience, these tools can add a lot of value.
Before using any of these third-party apps, make sure that they are compatible with your setup and the VR content you’re planning to use. You might need to go through a small installation and syncing process, but once it’s up and running, the results are worth it.
Once you have all the software installed, you’re almost ready to dive into the experience. The setup process is straightforward, and as long as you make sure all your apps and devices are synced properly, you’ll be good to go. Make sure to take your time during this step—setting up your software correctly is the foundation for an unforgettable, seamless long-distance experience.
Step 3: Connect the Lovense Max 2 to Your Device
Now that you’ve got all your equipment ready and the necessary software installed, it’s time to connect your Lovense Max 2 to your device. This step is crucial for ensuring a seamless and interactive experience. Let’s walk through the process together.
Turn On the Lovense Max 2
First things first, power up your Lovense Max 2. Locate the power button on the device and press it. If it’s your first time using it, make sure it’s fully charged; a complete charge takes approximately 2 hours.
Open the Lovense Remote App
Once your Max 2 is powered on, open the Lovense Remote app on your smartphone or PC. This app acts as the bridge between you and your device, allowing you to control various settings and features.
Enable Bluetooth and Search for Devices
Ensure that Bluetooth is enabled on your device. Navigate to your device’s Bluetooth settings and turn it on. The app will automatically search for available devices. Look for “Max 2” in the list of available devices. If you see multiple entries, they might represent the two Bluetooth modules built into the Max 2. In such cases, try pairing with each one to determine the correct connection.
Select Max 2 and Confirm the Connection
Once you identify “Max 2” in the list, tap on it to initiate the pairing process. A prompt may appear asking for a pairing code; if so, enter “0000”. After entering the code, the devices should pair successfully. The app will confirm once the connection is established, and you’ll be ready to explore all the interactive features the Lovense Max 2 has to offer.
Troubleshooting Tips:
- Bluetooth Not Detecting Max 2: Ensure that the Max 2 is powered on and within close proximity to your device. If it’s not showing up, try restarting both the Max 2 and your device’s Bluetooth.
- Connection Issues: If you encounter problems during pairing, refer to the official Lovense pairing guide for detailed troubleshooting steps.
By following these steps, you should have your Lovense Max 2 connected to your device, paving the way for an immersive and interactive experience. If you run into any issues, don’t hesitate to consult the user manual or reach out to Lovense’s support team for assistance.

Step 4: Sync the Lovense Max 2 with VR Content
Now that your Lovense Max 2 is connected to your device, it’s time to sync it with your VR content for a fully immersive experience. Here’s how to get everything working together seamlessly.
Open Your Preferred VR Media Player
Start by launching your chosen VR media player. If you’re using Whirligig, DeoVR, or Virtual Desktop, make sure the application is updated to the latest version to ensure compatibility with your Lovense Max 2. These players support interactive VR videos that can sync with your device, enhancing the realism of your experience.
Load a Compatible Interactive VR Video
Once your VR media player is open, browse your library or access your preferred streaming service to select an interactive VR video compatible with the Lovense Max 2. Interactive videos are designed to respond to your device’s movements and inputs, creating a dynamic and engaging experience. Ensure that the content you choose is specifically labeled as interactive or compatible with haptic feedback devices.
Import a Script File (If Using ScriptPlayer)
If you’re utilizing ScriptPlayer to enhance your interactive experience, you’ll need to import a script file corresponding to your chosen VR video. Script files contain data that syncs the video’s actions with your Lovense Max 2, ensuring that the device reacts appropriately to the on-screen content. To import a script:
- Locate the Script File: Find the script file on your device.
- Import the Script: In ScriptPlayer, use the ‘Import’ or ‘Load Script’ option to select and open the script file.
- Confirm Synchronization: Ensure that the script is correctly loaded and associated with your VR video.
For detailed instructions on using ScriptPlayer, refer to the official user guide.
Ensure Real-Time Reaction of the Lovense Max 2
With your VR video loaded and, if applicable, your script imported, it’s time to ensure that the Lovense Max 2 responds in real-time to the content. Play the video and observe how the device reacts to the video’s actions. The movements and sensations should align closely with the on-screen content, providing a synchronized and immersive experience.
Troubleshooting Tips:
- Device Not Responding: If the Lovense Max 2 isn’t reacting as expected, check the following:
- Bluetooth Connection: Ensure that your device’s Bluetooth is enabled and that the Max 2 is properly connected.
- Software Updates: Verify that all related software, including your VR media player and any script players, are up to date.
- Script Accuracy: Confirm that the script file matches the VR video and is correctly imported.
- Synchronization Issues: If there’s a delay or mismatch between the video and the device’s reactions:
- Adjust Settings: Look for synchronization settings within your VR media player or script player to fine-tune the experience.
- Consult Support: Reach out to the support teams of your software providers for assistance with advanced troubleshooting.
By following these steps, you can synchronize your Lovense Max 2 with interactive VR content, creating a personalized and immersive experience that enhances your connection with your partner. Remember to always use content and scripts compatible with your device to ensure optimal performance and safety.
Step 5: Fine-Tune Your Experience
Now that you’ve set up your Lovense Max 2 and synced it with your VR content, it’s time to personalize your experience. Adjusting settings and experimenting with different content can significantly enhance your pleasure. Here’s how to fine-tune your setup:
Adjust Intensity and Speed Settings in the Lovense Remote App
The Lovense Remote app offers customizable controls to tailor your experience:
- Open the App: Launch the Lovense Remote app on your smartphone or PC.
- Connect Your Device: Ensure your Lovense Max 2 is connected.
- Access Controls: Navigate to the device settings within the app.
- Modify Settings: Use the sliders or input fields to adjust vibration intensity, contraction strength, and speed to your preference.
Finding the right settings can greatly enhance your experience. Feel free to experiment until you discover what works best for you.
Ensure a Stable Internet Connection for Cloud-Based Scripts
If you’re using cloud-based scripts, a stable internet connection is crucial to prevent lag and synchronization issues:
- Check Your Connection: Verify that your internet speed meets the requirements for streaming interactive content.
- Reduce Network Load: Limit the number of devices using your network simultaneously to ensure optimal bandwidth.
- Use a Wired Connection: If possible, connect your device directly to your router using an Ethernet cable for a more stable connection.
A reliable internet connection minimizes delays between your actions and the device’s responses, enhancing the realism of interactive content.
Experiment with Different VR Content
Exploring various types of VR content can help you find what resonates most with you:
- Interactive Videos: These are designed to respond to your device’s movements and inputs, creating a dynamic experience. Ensure that the content is compatible with haptic feedback devices like the Lovense Max 2.
- Scripted Content: Utilize platforms like ScriptPlayer to sync your VR videos with your device, enhancing the interactivity. Be aware that some scripts may not be optimized for the Max 2, as it’s primarily a vibrating device.
- Adjustable Features: Some VR platforms allow you to customize the intensity and responsiveness of your device in real-time, offering a more personalized experience.
By experimenting with different content and settings, you can discover combinations that provide the most satisfying and immersive experiences.
Remember, the key to a fulfilling experience is personalization. Take the time to adjust settings, explore various types of content, and find what works best for you. Your preferences are unique, and tailoring your setup will lead to the most enjoyable outcomes.
Troubleshooting Common Issues
Even with the best setup, sometimes things don’t go as smoothly as expected. But don’t worry! Troubleshooting common issues can often be a quick fix, and we’re here to guide you through some of the most frequent problems you might encounter with the Lovense Max 2 when syncing it with your VR experience.
Lovense Max 2 Not Connecting?
One of the most common issues when using the Lovense Max 2 with your VR setup is a connection problem. If you’re having trouble getting the device to connect, follow these troubleshooting steps:
- Restart the Toy and Bluetooth:
- First, power off your Lovense Max 2 and restart it. This can help refresh the connection process.
- Next, turn off Bluetooth on your device (whether it’s your phone or PC), then turn it back on. This ensures that your device properly scans for the Max 2.
- Check for Interference:
- Ensure there are no other Bluetooth devices nearby that could interfere with the connection. Other devices can sometimes cause signal issues or confusion in pairing.
- If you’re using a PC, try restarting the Bluetooth service or even using a Bluetooth dongle if you suspect your built-in adapter is having issues.
- Re-pair the Device:
- After restarting everything, open the Lovense Remote app again, search for your device, and pair it once more. Make sure you’re selecting the correct device from the list.
- Firmware Updates:
- It’s always worth checking if your Lovense Max 2’s firmware is up-to-date. Manufacturers often release updates to fix bugs or improve connectivity.
By taking these steps, you should be able to quickly resolve any issues with the device not connecting to your phone or PC.
Sync Delay in VR?
If you’re noticing a delay between what’s happening in the VR content and the response from the Lovense Max 2, that can definitely be frustrating. This kind of lag can break the immersion, but there are a few things you can check:
- Check Your Internet Speed:
- If you’re streaming interactive VR content or using cloud-based scripts, a slow or unstable internet connection can cause lag between the video and the device’s movements.
- Run a speed test to make sure your internet speed is fast enough to support VR content and syncing devices. For smooth performance, a speed of at least 15 Mbps is recommended.
- Use a Wired Connection:
- If you’re using a wireless connection, try switching to a wired Ethernet connection. Wi-Fi can introduce latency, especially if multiple devices are connected to the same network. A wired connection will give you a faster, more stable connection, reducing any sync delay.
- Reduce Network Load:
- If you’re running multiple devices or streaming other content on your network, try disconnecting some devices. This helps ensure your VR setup gets the maximum bandwidth available, which can help reduce delays.
- Close Background Apps:
- Sometimes, running apps in the background can cause lag or slow down performance. Close any unnecessary programs on your PC or phone that might be using up resources, leaving more power for your VR and Lovense setup.
- Check VR Video Quality:
- If you’re playing high-definition VR content, the file size can sometimes overwhelm your system or cause delays. If you’re having persistent issues, try lowering the resolution of the video and see if that helps with syncing.
By making these adjustments, you should see a noticeable improvement in the responsiveness of your VR content and Lovense Max 2 device.
App Not Recognizing Toy?
Another frustrating issue is when the Lovense Remote app doesn’t seem to recognize the Max 2, leaving you stuck without control over the toy. Here’s what you can do to resolve this:
- Ensure Firmware is Updated:
- Just like with connection issues, an outdated firmware can prevent your Lovense Max 2 from being properly recognized by the app. Check the app or the Lovense website for any available firmware updates, and follow the instructions to install them.
- Grant App Permissions:
- Sometimes the app needs specific permissions on your phone or PC to function correctly. Make sure that the Lovense Remote app has all the necessary permissions, including access to Bluetooth, notifications, and any other required features.
- Restart the App and Device:
- Close the Lovense Remote app completely and restart it. After restarting, open the app and check again if it detects the toy.
- Additionally, try restarting your device (phone or PC) to clear any temporary issues that might be affecting the app.
- Reinstall the App:
- If none of the above steps work, try uninstalling and reinstalling the Lovense Remote app. This will ensure that any corrupted files or settings are reset, and you start fresh with a clean installation.
- Bluetooth Troubleshooting:
- Check if your Bluetooth is enabled and working properly. If your device isn’t finding the toy, toggle Bluetooth off and back on, or restart your Bluetooth adapter (on a PC).
- Contact Customer Support:
- If the app still isn’t recognizing your Lovense Max 2 after all these troubleshooting steps, reach out to Lovense’s customer support. They can guide you through more advanced solutions or potentially assist with replacing a faulty device.
By following these tips, you should be able to fix the common issues related to app connectivity and enjoy your immersive VR experience without interruptions. Remember, a bit of patience and persistence goes a long way when dealing with technology!

Conclusion Lovense Max 2 with VR
Syncing the Lovense Max 2 with your VR setup may seem like a lot of steps at first, but once everything is up and running, the experience is truly game-changing. Whether you’re enjoying it solo or using it to spice things up with a partner, this combination takes your immersive VR sessions to a whole new level. It’s all about that deep connection between the real and the virtual, where every movement feels more intimate, more responsive, and more thrilling.
Once you’ve got your devices connected, the fun is just getting started. With this setup, you’ll be able to dive into a world where your body and mind fully interact with your VR experience. Get creative with the content you try out, whether it’s exploring new videos, testing out different intensities, or just enjoying the seamless connection. So go ahead—dive in and enjoy this interactive and immersive journey.
Other alternatives to Lovense Max that i think you should check out:
Lovense Solace Review: The Ultimate App-Controlled Vibrator for Couples
Handy Sex Toy – The Game-Changer for Intimacy and Pleasure!
Frequently Asked Questions (FAQ)
1. Which VR headsets are compatible with Lovense Max 2?
If you’re using a major VR headset, you’re in luck—the Lovense Max 2 works with several popular models. The most compatible ones include:
- Oculus Quest
- HTC Vive
- Valve Index
These headsets, when paired with a compatible VR media player, will allow you to sync seamlessly with the Lovense Max 2, giving you the most immersive experience possible.
2. Do I need a PC to connect Lovense Max 2 with VR?
No, you don’t need a PC, but it can enhance your experience. You can easily pair the Lovense Max 2 with your smartphone using the Lovense Remote app. However, if you’re looking to unlock even more interactive features, such as using third-party apps like ScriptPlayer or HandyFeeling for advanced syncing, a PC setup can really take things to the next level. It’s all about your preferences—if you want a more portable experience, go with your phone; if you want to dive into all the extra features, connect it to your PC.
3. Where can I find interactive VR content for Lovense Max 2?
There are a ton of places to explore interactive VR content that syncs perfectly with the Lovense Max 2. A few popular platforms include:
- SexLikeReal (SLR)
- VRPorn
- FeelMe
These sites offer high-quality interactive VR videos designed to sync with toys like the Lovense Max 2. With a bit of exploration, you’ll find content that brings your virtual and physical experiences together in a way you never thought possible.
The combination of VR and Lovense Max 2 opens up endless possibilities for immersive pleasure. Whether you’re new to VR or a seasoned pro, you’ll find plenty of content to get lost in and enjoy. Take your time experimenting with different setups and content to find the experience that works best for you.


![Which Countries Masturbate the Most? [International Statistics]](https://lamourbox.com/wp-content/uploads/2025/05/IMG_8255-768x1365.jpg)

